
How To Make a Face Mask | Home-Made Protection Against COVID19
How To Make a Face Mask
A special edition blog post by Cheryl Moyle.
Most of us have never lived through a pandemic, it’s unprecedented times.
From toilet paper scarcity to only being aloud outside for 30 minutes of exercise a day, life as we know it has been turned upside down.
I really empathise for our family and friends who are also our clients, who haven’t been able to get their hands on basic hygiene products at this time.
This is why I made a little DIY Face Mask post, so anyone who wants this protection can have access to it :)
I hope you enjoy the creation process!
From our family to yours, stay safe and look after each other, this won’t last forever and there will be better days :)
How & Why I Have Been Making Face Masks
My face masks have been made in Men’s, Women’s & Teenage size.
I simplified the original pattern to cater for fellow non sewers like myself. They are very simple to make & I used materials that I already had at home.
These masks are lined for extra protection. I used the fabric shopping bags from Aldi, Woolworths or Coles as this is a fine woven material but I’m sure you could also use a similar tight weave fabric. For the main fabric, I used left over cotton material.
Its been years since I have attempted any sewing or craft, but I dug out my old sewing machine from the back cupboard & to my surprise it wasn’t seized.
My knowledge of sewing is very limited & dates back to home economic classes in high school, along with a limited amount of craft with my kids when they were little which is quite a few years back.
I guess what I’m trying to say, is if I can make these face masks, you can too.
If you don’t have a sewing machine, maybe a family member, friend or neighbour has one you could borrow.
After originally making around 12 face masks for our plumbers, I had a large response from friends, relatives & work colleges asking me to make some for their elderly parents or family members who are immune compromised. To make the process quicker & enable me to make a larger quantity, I borrowed an overlocker, but you certainly don’t need an overlocker if you’re only making a few for home use.
Do I need a Face Mask?
Making face masks for our plumbers came as a need, as like everybody else, we were unable to purchase any medical or surgery masks from anywhere.
Due to the Covid19, I’m working from home & have the tele playing in the background, when I hear an interview from an Australian medical researcher now based in San Francisco.
It caught my attention, the discussion was about the debate around who should wear face masks.
I now wish that I got the Doctors name, but it was his opinion, based on his research, that every healthy person leaving their home during the Covid19 pandemic, should be wearing a face mask, e.g. to the supermarket or in public to protect themselves.
There was a discussion on the shortage of face masks, and his solution was that people make their own.
His argument was that the virus is caught through droplet transmission through the mouth, nose & eyes.
By holding a piece of material between a person sneezing & yourself will protect better than not having this material.
The question was asked, ‘What about wearing a bandana?” His reply was yes!
He also talked about the statistics in the overcrowded countries where they wear masks on a daily basis like Japan, Hong Kong & Korea.
These places have not had the virus spread as much as the western world that does not wear face masks.
I found a lot of different patterns on the internet & decided that the moulded type over the nose would be more comfortable to work in than the rectangle type.
This is confirmed by my Plumbers after now wearing them for a week from this blog :)
I originally made the face masks using a piece of elastic around the ears, I have now altered the pattern to have 2 bands of elastics behind the head, which I’m told by my plumbers, is much more comfortable & they are able to hang it under the chin when not in use.
I recommend you make a few for each person, as you will need to wash the mask each day after use.
I also recommend you wash them on a delicate wash in a bra bag to help them last longer.
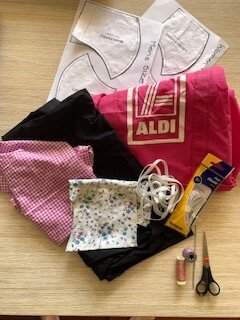
The photos show a variety of different coloured fabrics that I used along the way.
Moyle Plumbing is a family owned maintenance & emergency Plumbing company, servicing our local community since 1983.
Brisbane to the Gold Coast, including Logan City.
We are more than just a plumbing service, we’re a true blue family, here for our family, friends and clients alike.
Should you ever have a plumbing emergancy or require general maitence, we’d love to be of assistance.
Book your emergency job before 11 am & we can offer same day service.
0447 671 095
To show your support, please like our Facebook or Instagram pages.
Tag us on your posts #moyleplumbing
Blocked drains, blocked toilets, burst water pipes, burst taps, hot water + much more.
Thank you & Stay safe
INSTRUCTIONS | How To Make Your Own Face Mask
Materials
Fabric for the main mask (Cotton)
Fabric shopping bags from Aldi/Coles/Woolies for the lining.
Cotton
60cm for women & children or 72cm of elastic for the men’s face mask.
Step 1
Download & print the Mens Pattern
Download & print the Womens Pattern
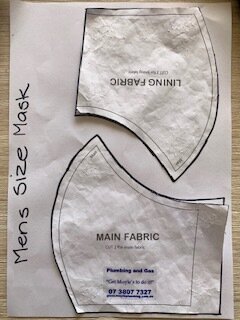
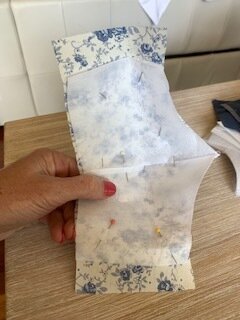

You will need 2 pieces of material for each pattern. (left & right side of mask)
Just fold the fabric in ½, so you cut out 2 pieces at once. (left & right)
Place then pin the pattern onto the fabric.
Do this for the main & lining.
Main pattern on the cotton fabric & lining pattern
on the shopping bag fabric.
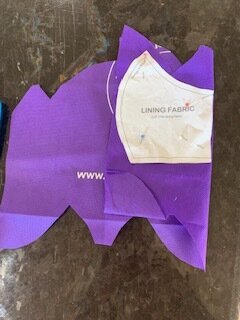
Step 2
Cut out the pattern around the perimeter of the pattern.
Step 3
With the fabric turned in side out, pin the fabric together. Do this for both the main & liner.
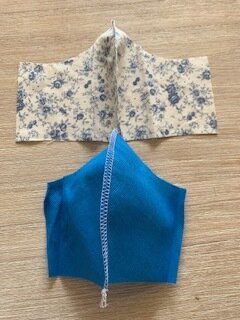
Step 4
Sew the longest curve side of the pattern from top to bottom.
This is where it will mould around the nose.
I recommend you zig zag the edge to stop fray along with straight stich, allowing a seam approx 5mm from the edge this section of fabric.
Do this to the lining as well as the main fabric.
Try to keep the centre join to one side & could stich it down if you prefer. Keep this stich close to the centre line. as it what you will see when the mask is worn.
Trim all the loose cotton off as you go.
Step 5
Place & pin both the main & lining fabric together with the joins on the inside so you cannot see them.
Step 6
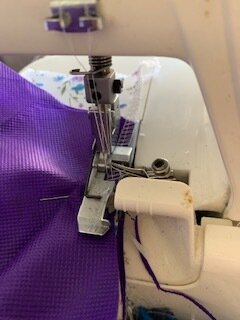
Zig zag stich all the way around the outer edge. (perimeter) Start & finish on the same spot.
Trim the cotton as you go.
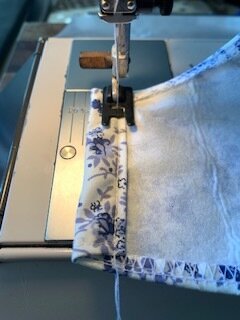
Step 7
Turn the zig zagged top & bottom edge to the inside & straight stich it down to secure. Make this turn just wide enough to hide the zig zag from the front.
You should now have what is looking like a mask with only the ends to finish.
Step 8
Double fold, pin, then straight stich sew the fabric to the inside at each end to hide the zig zag, while allowing enough room to allow you to pull the elastic through.
I doubled sewed this straight stich, as it will hold pressure from the elastic.
Trim the loose cotton.
Step 9
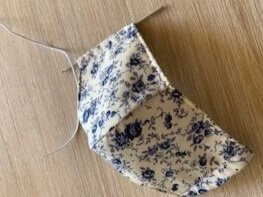
Using a crochet hook or a small safety pin, thread 70cm of elastic for men, or 60cm of elastic for women & teens through each end of the mask.
Tie or stich the ends of the elastic together.
Congratulations, hopefully you have successfully made a face mask to help protect your family, friends or work colleagues.
Stay safe
Please like, comment & post your photos on our Facebook or Instagram pages.
Tag us on your photos
#moyleplumbing #covid19
